Building Digital Bridges: A Comprehensive Guide to Setting Up a Homegroup in Windows 7
In the interconnected world of modern computing, sharing files, printers, and media between devices within a home network has become essential. Windows 7 introduces a powerful feature known as Homegroup, designed to simplify the process of sharing resources and collaborating with other devices on the same network. In this extensive guide, we will explore the intricacies of setting up a Homegroup in Windows 7, empowering users to create seamless networks where sharing is effortless and secure.
Understanding Homegroup:
Before diving into the setup process, let’s first understand what Homegroup is and how it works:
- Definition: Homegroup is a feature introduced in Windows 7 that allows users to create a secure network where they can easily share files, folders, printers, and media with other devices on the same network.
- Simplicity and Convenience: Homegroup simplifies the process of sharing resources by providing an intuitive interface and automating many of the complex networking tasks. With Homegroup, users can quickly create a network and start sharing files with just a few clicks.
- Security: Homegroup ensures that only authorized users have access to shared resources by requiring a unique password to join the Homegroup. This password is automatically generated during the Homegroup setup process and can be shared with other users to grant them access.
Setting Up a Homegroup:
Now, let’s delve into the step-by-step process of setting up a Homegroup in Windows 7:
- Open Homegroup Settings:
- Click on the Start button in the taskbar.
- Type “Homegroup” in the search box and press Enter.
- Alternatively, navigate to “Control Panel” > “Network and Sharing Center” > “Homegroup.”
- Create a Homegroup:
- In the Homegroup window, click on the “Create a Homegroup” button.
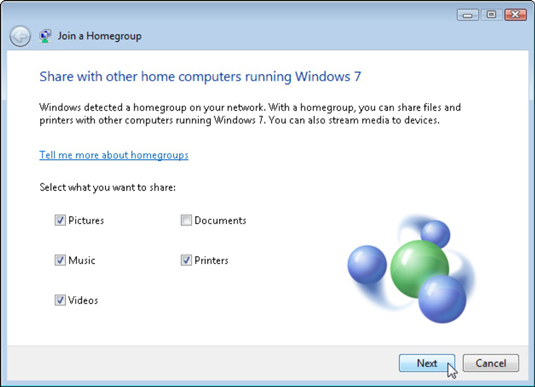
- Windows will prompt you to choose which types of resources you want to share, such as files, printers, and media. Check the boxes next to the resources you want to share and click “Next.”
- Generate Homegroup Password:
- Windows will generate a unique password for the Homegroup. Note down this password, as you will need it to join other devices to the Homegroup.
- Click on the “Finish” button to create the Homegroup.
- Share Files and Folders:
- After creating the Homegroup, you can start sharing files and folders with other devices on the network.
- To share a file or folder, simply right-click on it, select “Share with,” and choose “Homegroup (view)” or “Homegroup (view and edit)” depending on the level of access you want to grant.
- Joining Other Devices to the Homegroup:
- To join other devices to the Homegroup, you will need to use the Homegroup password generated during the setup process.
- On the other device, open the Homegroup window and click on the “Join now” button.
- Windows will prompt you to enter the Homegroup password. Enter the password and click “Next” to join the Homegroup.
- Accessing Shared Resources:
- Once a device has joined the Homegroup, it can access shared resources such as files, folders, printers, and media from other devices in the Homegroup.
- To access shared resources, open File Explorer, navigate to the Homegroup section, and double-click on the device or resource you want to access.
Managing Homegroup Settings:
After setting up a Homegroup, you may want to customize its settings or manage the shared resources. Here’s how you can do it:
- Change Homegroup Password:
- To change the Homegroup password, open the Homegroup window, and click on the “Change the password” link. Follow the on-screen instructions to generate a new password.
- Add or Remove Devices:
- You can add or remove devices from the Homegroup at any time. Open the Homegroup window, and click on the “Change what you’re sharing with the Homegroup” link. From here, you can add or remove devices and customize the resources they have access to.
- View or Change Advanced Sharing Settings:
- Windows 7 offers advanced sharing settings that allow you to customize network discovery, file and printer sharing, and other network-related options.
- To access advanced sharing settings, open the Network and Sharing Center, and click on the “Change advanced sharing settings” link. From here, you can customize sharing options according to your preferences.
Conclusion:
Setting up a Homegroup in Windows 7 is a straightforward process that empowers users to create secure and seamless networks for sharing files, printers, and media with other devices. By following the comprehensive guide outlined above, users can quickly establish Homegroups and start sharing resources with ease. Whether you’re collaborating with family members, sharing files with coworkers, or accessing media from different devices, Homegroup simplifies the process and ensures that sharing is effortless and secure. So take advantage of this powerful feature in Windows 7 and build digital bridges that connect your devices and enhance your computing experience.


