A Comprehensive Guide to Recording Audio in Ableton Live: Capturing Soundscapes, Performances, and Vocals

Recording audio in Ableton Live opens up endless possibilities for capturing live performances, vocals, instruments, and field recordings with precision and flexibility. Whether you’re a solo artist, a band member, or a sound designer, mastering the art of audio recording in Ableton Live empowers you to bring your sonic visions to life with clarity and depth. In this extensive guide, we’ll explore every facet of recording audio in Ableton Live, from setting up your audio interface to capturing pristine recordings and editing them with finesse.
Understanding Audio Recording:
Before we delve into the specifics of recording audio in Ableton Live, let’s establish a foundational understanding of audio recording and its significance in music production:
- What is Audio Recording? Audio recording involves capturing sound waves in real-time and converting them into digital data that can be stored, manipulated, and reproduced. Audio recordings can capture performances, vocals, instruments, and environmental sounds with remarkable fidelity and detail.
- Audio in Ableton Live: Ableton Live offers robust audio recording capabilities, allowing users to record live performances, vocals, instruments, and other audio sources directly into the software. Recorded audio can be edited, processed, and arranged within Ableton Live’s versatile workspace.
- Advantages of Audio Recording: Audio recording offers several advantages over MIDI recording, including capturing the subtle nuances of live performances, preserving the unique timbres of acoustic instruments, and capturing the ambiance of real-world environments. Audio recordings can add depth, warmth, and authenticity to your music production.
Getting Started with Audio Recording:
Now that we have a solid understanding of audio recording, let’s explore how to get started with recording audio in Ableton Live:
- Setting Up Your Audio Interface:
- Connect your audio interface to your computer via USB or Firewire cables.
- Open Ableton Live and navigate to the Preferences menu.
- In the Audio tab, select your audio interface from the list of available input and output devices. Configure the sample rate, buffer size, and other audio settings as needed.
- Creating Audio Tracks:
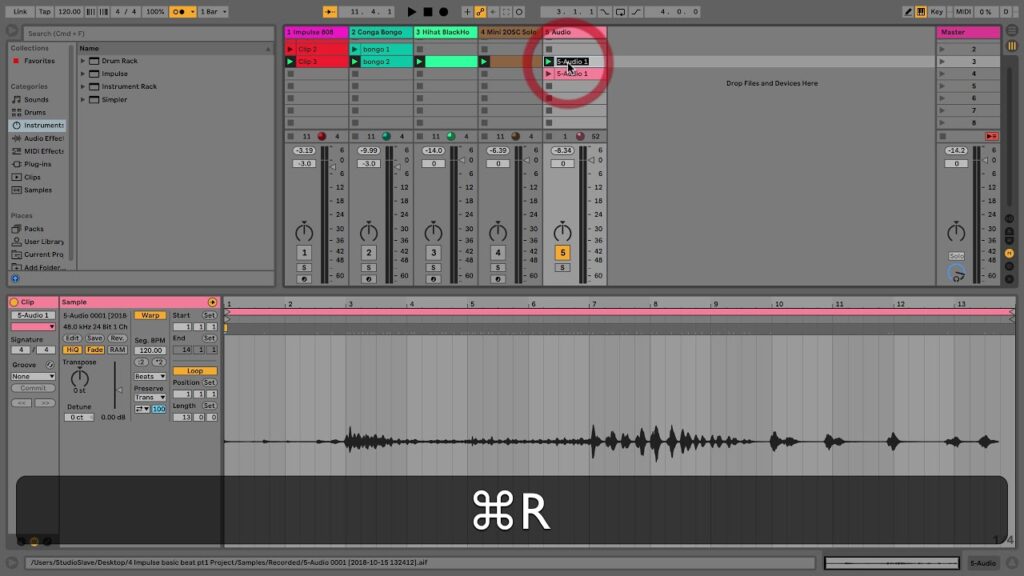
- In Ableton Live’s Session or Arrangement View, create a new audio track by clicking the “+” button in the track header.
- Configure the audio track’s input routing to receive audio from your desired input source (e.g., microphone, instrument input).
- Arm the audio track for recording by clicking the record button in the track header.
- Recording Audio:
- To record audio into a track, ensure that the track is armed for recording and that the input source is properly configured.
- Click the record button in the transport bar, or press the record shortcut key (default: “Shift + Space”), to start recording audio input from your interface.
- Perform or play your audio source to capture the audio recording in real-time.
- Monitoring and Playback:
- While recording, use Ableton Live’s monitoring options to listen to the input signal in real-time through your headphones or studio monitors.
- After recording, use the playback controls in Ableton Live to audition and review your audio recordings. Use the timeline to navigate through your recordings and make adjustments as needed.
Advanced Techniques and Workflow Tips:
Now that we’ve covered the basics of audio recording in Ableton Live, let’s explore some advanced techniques and workflow tips to enhance your productivity and creativity:
- Multiple Takes and Comping:
- Take advantage of Ableton Live’s multiple take recording feature to capture multiple versions of a performance. Record multiple passes of your audio source and comp together the best parts of each take to create a perfect composite performance.
- Use Ableton Live’s track lanes feature to organize and manage multiple takes within the same track, making it easy to compare and select the best parts of each recording.
- Editing and Processing:
- After recording audio, use Ableton Live’s editing tools to refine and polish your recordings. Trim, cut, and crossfade audio clips to remove unwanted noise, silence, or mistakes.
- Experiment with audio processing and effects to enhance the sound of your recordings. Use EQ, compression, reverb, and other effects to shape the tone, dynamics, and spatial characteristics of your audio.
- Automation and Modulation:
- Explore automation and modulation to add movement and expression to your audio recordings. Use automation envelopes to control parameters such as volume, panning, and effect settings over time.
- Experiment with modulation effects such as chorus, flanger, and phaser to add depth, movement, and character to your audio recordings.
Integrating Audio Recording into Your Workflow:
As you become more comfortable with audio recording in Ableton Live, consider integrating it into your overall music production workflow in the following ways:
- Capturing Performances and Vocals:
- Use audio recording to capture live performances, vocals, and acoustic instruments with pristine fidelity and clarity. Experiment with different microphones, placements, and techniques to achieve the desired sound.
- Sampling and Sound Design:
- Use audio recording to capture unique sounds, textures, and environments for use in sampling and sound design. Record field recordings, foley effects, and found sounds to add depth and realism to your compositions.
- Mixing and Mastering:
- Incorporate audio recording into your mixing and mastering process to create polished, professional-quality mixes. Use recorded audio tracks alongside virtual instruments and MIDI sequences to create dynamic and engaging mixes.
Conclusion:
Audio recording in Ableton Live offers a powerful and flexible workflow for capturing, editing, and producing high-quality audio recordings. By mastering its features, techniques, and workflow, you’ll unlock a world of creative possibilities for musical expression and experimentation.
Whether you’re capturing live performances, vocals, instruments, or environmental sounds, audio recording in Ableton Live provides the tools and flexibility needed to bring your sonic visions to life with precision and flair. So, dive in, experiment, and let the boundless creativity of audio recording inspire your musical journey in Ableton Live!


